Wednesday, November 26, 2008

Sketch Challenge

11:20 PM 3 Comments
Hello! I'm getting this on here very late because today was my youngest son's 1st birthday! My family drove down early and we had a small party for him this evening : ) It's kind of sad because I know he's my last baby, but on the other hand, there is a lot to look forward to as well! Anyway, this was the card I made for today's sketch challenge on Splitcoast which can be found here:

http://www.splitcoaststampers.com/forums/showthread.php?t=400454

The colors I used are Baja Breeze and Real Red cardstock, and Stampin' Up Ski Slope Designer Series Paper. I added a zigzag stitch around the DSP panel and I used my Snowflake Cuttlebug Folder to emboss the red strip down the middle. I popped the image panel up on foam squares and added Stickles to the snowflakes and also to the punched snowflakes (I can't seem to get away from those punched snowflakes this week!) The stamp I used is a Penny Black stamp. Isn't he cute! I put brads in all the corners and it was complete! Hope you like it and thanks for stopping by!

Tuesday, November 25, 2008

Box In A Bag

5:37 PM 3 Comments
I decided to make a project for the Verve challenge that can be found here:

http://www.splitcoaststampers.com/forums/showthread.php?t=399538

The challenge is to make anything but a card, or ABC challenge : ) I chose to make this cute box in a bag. You can find the instructions for this here:

http://www.splitcoaststampers.com/resources/tutorials/boxinabag/

For my paper I used Scenic Route Sonoma DP, Kiwi Kiss, Very Vanilla, and Chocolate Chip. I followed the instructions for the bag, stamped my ornament image with VersaMark and embossed with copper embossing powder. I colored the image in with sponge daubers using my Kiwi Kiss ink pad, colored the stripes in with my Real Red marker, stamped the Merry Christmas with Chocolate Chip and cut it out. I raised it up with foam squares onto my squares that I cut with my Nestabilities. The snowflakes were punched with a Martha Stewart snowflake punch and I put a Kaiser green rhinestone in the middle of each one. I used polka dot red sheer ribbon to tie the tabs together, and Offray red ribbon for the bow on the ornament. I hope you like it and thanks for stopping by!

Kerri

1:34 PM 3 Comments
This is the card I made for today's Color Challenge on Splitcoast to use Going Gray, Really Rust, and Very Vanilla. I don't have any Going Gray, so I substituted some gray cs from DCWV. I stamped the tree on Very Vanilla with Chocolate Chip ink. I stamped the leaves with Really Rust and cut everything out. I adhered the leaves to the branches and adhered the finished tree to my square panel that I cut with Nestabilities. I popped the entire panel up on foam squares and placed that on the Very Vanilla panel that I put through the Swiss Dots CB folder. I stamped the sentiment and punched it out with a circle punch. I punched out a larger circle in Really Rust and used the Scalloped circle punch to punch out the gray. I used a 1/16" circle punch to punch little holes in the scallops and added brown brads to the corners. Then I mounted the whole thing onto the Really Rust base which measures 5x5. Hope you like it, and thanks for stopping by!

Kerri

Monday, November 24, 2008

Ornamental Christmas Card

1:19 PM 3 Comments

I couldn't wait to make a card with my new stamp set from Verve called Ornamental Christmas which you can find here:
I stamped the ornament image with VersaMark on Berry cardstock from The Paper Company which you can find at Joann's. I heat embossed with silver embossing powder. I then stamped the image again on white cardstock and heat embossed with silver embossing powder and cut out the center so I could stamp my sentiment and color the stripes with Old Olive. I then attached that to the center of the Berry ornament. I cut out the whole ornament and adhered it the the white panel that I cut with my Rectangle Nestabilities. The green panel is Old Olive cardstock. The Berry panel was dry embossed using the Cuttlebug Snowflake Folder. I added silver brads, the Prima poinsettia, and an Offray Cranberry bow and it's complete! Hope you like it, and thanks for stopping by!
Kerri

Gift Card Holder

12:22 PM 3 Comments


Today's Try A New Technique Challenge on SCS was to make this adorable gift card holder! The tutorial is found here: http://heroarts.com/blogs/club/2008/10/29/watch-it-wednesday-mini-card-with-a-surprise/

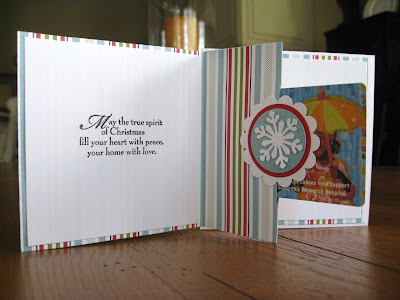
For my card I used some patterned paper from the Ski Slope DSP from Stampin' Up, Baja Breeze, and Whisper White. The stamp set is called Snow Swirled, also from SU. I stamped my tree with VersaMark, and heat embossed with silver embossing powder. I added the little pearls to the centers of the snowflakes on the tree, and a bow to the top. The snowflakes were punched with a Martha Stewart punch and I added Icicle Stickles to the tips. I used rectangle Nestabilities to cut out the image and add the scalloped frame. Inside I cut 2 panels out of white cs sized 3.75"x3.75" and stamped my sentiment. The other side can be used to write a little note : ) I used my 1 1/4" circle punch and a slightly larger circle Nestability to layer my circles and the SU Scalloped Circle Punch to create my little flap. Another snowflake was added to the center. Hope you like it, and thanks for stopping by!

Kerri

Sunday, November 23, 2008

Thanksgiving Place Cards

4:42 PM 2 Comments

Every year we host Thanksgiving. I always enjoy decorating the table, and thought I would make some pretty place cards.

I used Pumpkin Pie, Chocolate Chip, Very Vanilla, and Old Olive cardstock for my colors. I stamped the pumpkin image which is from a retired Stampin Up set called Harvest Hello that I found on Ebay : ) I colored the image in with Copic markers, and cut it out. I punched a 1 1/4 inch circle out of Very Vanilla and distressed it with some brown ink. I punched the scalloped circle with the SU Scallop Circle punch and used a little 1/16" Circle Punch to punch little holes all the way around. I adhered the circle to the scalloped circle, and then popped the pumpkins up using foam squares. I printed out everyone's names on the computer using Edwardian Script font and cut them out. The Chocolate Chip panel is dry embossed with the Swiss Dots Cuttlebug folder. I added brads to the 2 corners, and a spiral clip to the top left corner with some ribbon. The base is the Pumpkin Pie. I hope you like them, and thanks for stopping by!


Kerri

Saturday, November 22, 2008

Baby Shower

2:00 PM 3 Comments

Welcome! This is my first official day as a blogger! I have gotten very hooked on stamping and paper crafting, and people are always asking how I made this or that, so now I can post the details on here! I'm starting my blog off with some items that I made for my friend's baby shower. Shown here are the invitation, a table decoration, and the favors. All of the items were made with Green Tea Designer Series Paper (DSP) from Stampin' Up. The cardstock is Baja Breeze, Very Vanilla, Old Olive, and Certainly Celery from Stampin' Up as well. The image is from the She's All That set also from SU. I stamped the image with Baja Breeze ink onto the Baja Breeze cardstock. The ovals were cut out with Oval Nestabilities. The paint can was simply wrapped with the paper and ribbon, and I used the image, flowers, and sentiment to cover the seams. The flowers were made with a flower punch, and pearls were added to the center. The large flowers were cut with my Cricut machine and I added a punched flower and button to the center. The nugget candy was wrapped with paper (1 inch x 3 inches) and a punched flower was glued to the top. The little bag was a template I got from Splitcoast Stampers called Leigh's Totally Totes. Thanks for looking and I hope you stop by again!

Follow Us @soratemplates